Necessary equipment
EN-48243 Engine Removal/Installation Rack Assembly
EN-48244 Rack bracket for engine removal/installation assembly
Removal procedure
1. Discharge the air conditioning system (A/C), if available.
2. Drain the power steering fluid, if applicable.
3. Disconnect the negative battery cable.
4. Remove decorative cover. See «Decorative cover» in this section.
5. Remove the hoses and ducts of the charge air system. See «Air injection system» in this section.
6. Drain the engine coolant. See Section 1D1, Engine Cooling - 2.0 Diesel.
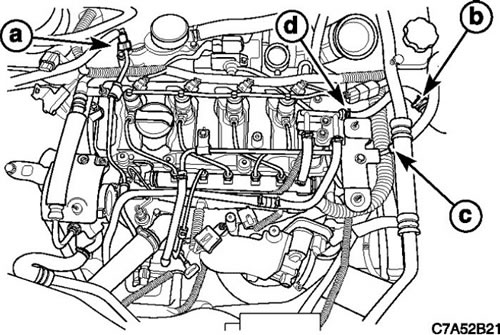
7. Disconnect connector (a) fuel supply line.
8. Disconnect the coolant hose from the expansion tank (b, c).
9. Disconnect the fuel return hose from the connection block (d).
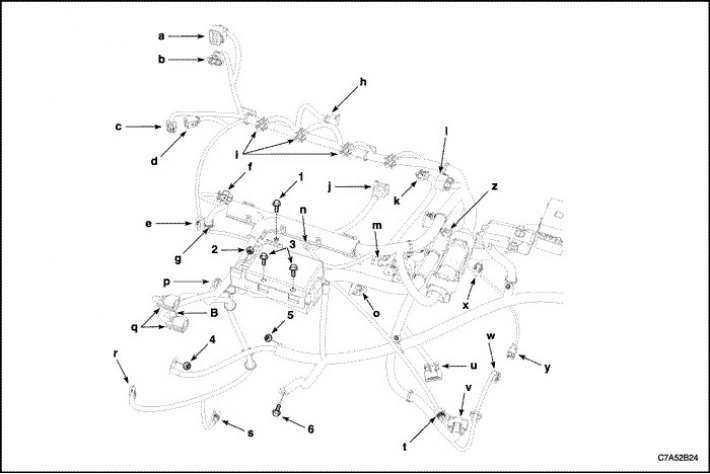
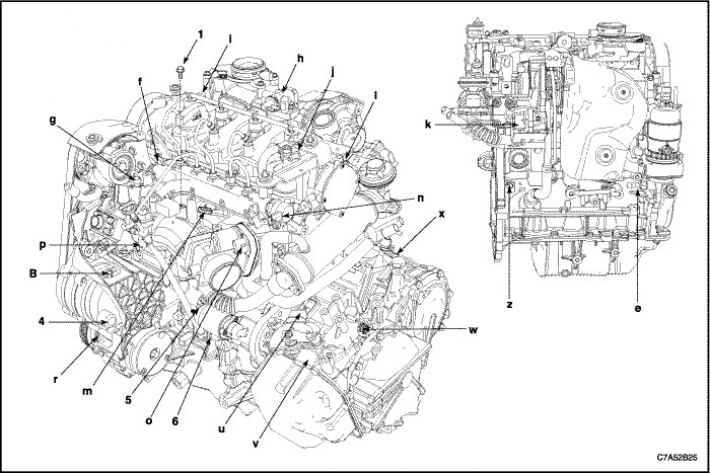
10. Disconnect the engine wiring harness.
- a) Disconnect the fuel heater wire connector.
- b) Disconnect the mass air flow sensor connector (MAF).
- c) Disconnect the exhaust gas temperature sensor wire connector.
- d) Disconnect the diesel particulate filter pressure sensor connector (DPF).
- e) Disconnect the engine oil pressure sensor connector.
- f) Disconnect the common rail pressure sensor connector.
- g) Disconnect the coolant temperature sensor connector.
- h) Disconnect the EGR vacuum solenoid connector.
- i) Disconnect the fuel injector connector.
- j) Disconnect the camshaft position sensor connector (CMP).
- k) Disconnect the turbocharger drive connector.
- l) Disconnect the glow plug wire connector.
- m) Disconnect the boost pressure sensor connector (T-MAP).
- n) Disconnect the common rail regulator connector.
- o) Disconnect the ETC housing connector.
- p) Disconnect the fuel injection pump connector.
- q) Disconnect the cooling fan connectors.
- r) Disconnect the A/C compressor connector.
- s) Disconnect the starter solenoid wire connector.
- t) Disconnect the A/C pressure sensor connector.
- u) Disconnect the transaxle range switch connector if it is an automated transaxle transaxle assembly.
- v) Disconnect the transaxle wiring harness connector if it is an automated transaxle transaxle assembly.
- w) Disconnect the input shaft speed sensor electrical connector if it is an automated transaxle.
- x) Disconnect the output shaft speed sensor electrical connector if it is an automated transaxle.
- y) Disconnect the speed sensor connector if it is a manual transaxle transaxle assembly.
- z) Disconnect the crankshaft position sensor.
- (B) Disconnect the generator connector.
- Remove the engine connector pinch bolt from the intake manifold.
- Remove the glow plug module.
- Remove the glow plug fuse box.
- Loosen the alternator B+ connector nut.
- Remove the starter solenoid connector nut.
- Loosen the engine ground screw.
11. Remove the expansion tank. See Section 1D1, Engine Cooling - 2.0 Diesel.
12. Remove the power steering pump pipes from the power steering pump. Follow See Section 6B, Power Steering Pump.
13. Remove the right/left drive shaft. See section 3A, "Front drive axle".
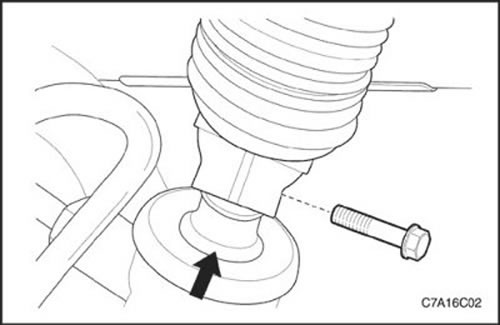
14. Loosen the lower intermediate shaft pinch bolt. See Section 6C, Power steering.
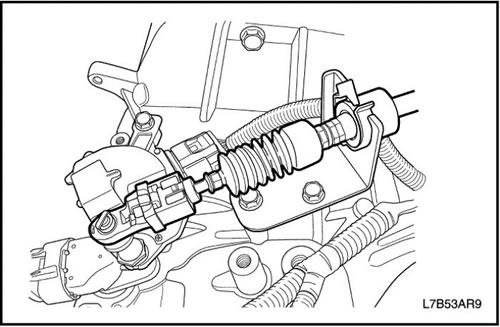
15. Remove the shift control cable from the automatic transaxle assembly. See Section 5A, AISIN 55-51LE automatic transaxle if it is an automatic transaxle.
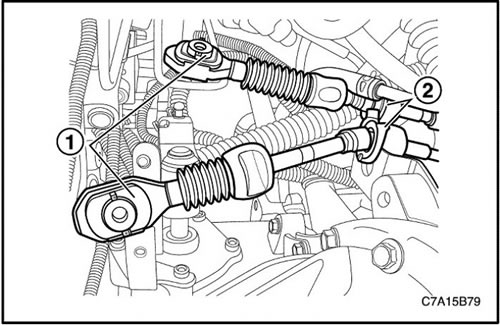
16. Remove the selector cable from the transaxle assembly. See Section 5B, Five-speed manual transaxle assembly if it is a manual transaxle transaxle assembly.
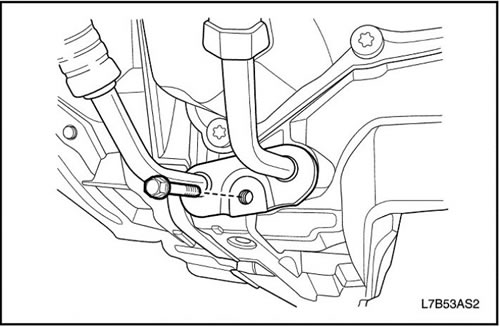
17. Remove the transaxle oil cooler hoses from the automated transaxle assembly. See Section 5A, AISIN 55-51LE automatic transaxle if it is an automatic transaxle.
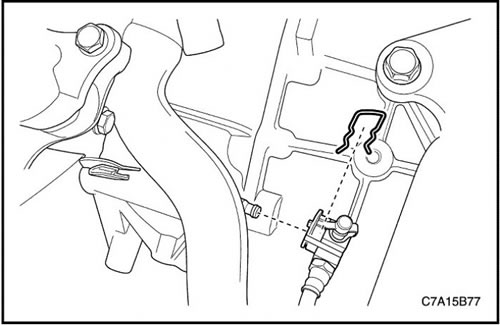
18. Remove the clutch cylinder pipe from the transaxle assembly. See Section 5B, Five-speed manual transaxle assembly if it is a manual transaxle transaxle assembly.
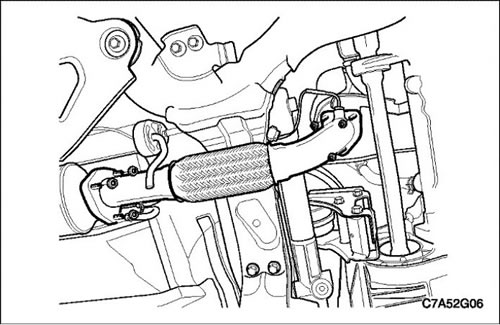
19. Remove the front silencer pipe between the pre-catalytic converter and the diesel particulate filter pipe (DPF). See Section 1G1, Exhaust System - 2.0 Diesel.
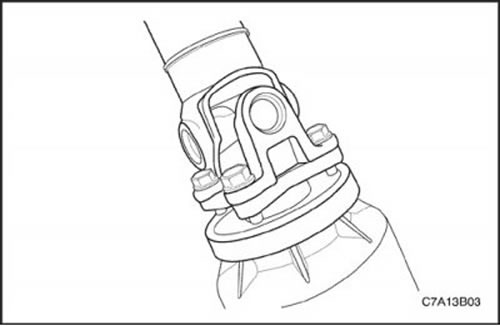
20. Remove the A/C compressor pipe from the compressor. Follow See Section 7B, Heating, Ventilation, and Air Conditioning Control.
21. Remove the power steering coolant return pipe. See Section 6A, Power Steering System.
22. Remove driveshaft assembly from transfer case, if equipped. See Section 3B, "Rear drive axle".
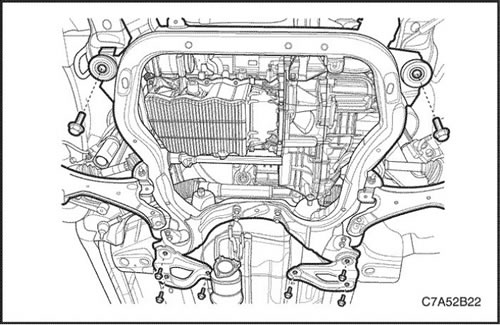
23. Remove the support bracket bracket.
24. Loosen the support pinch bolts.
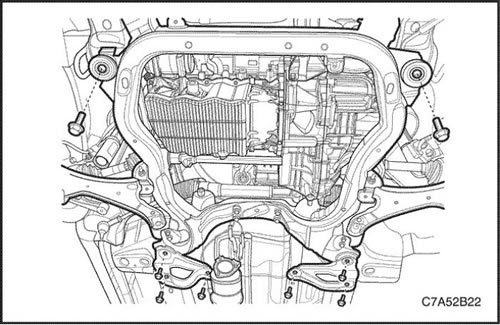
Attention! Verify that all components of the EN-48243 Engine Assembly Remove/Install Rack are aligned exactly with the EN-48244 Bracket as shown.
- 1~4: Support bracket
- a: Diesel oil pan bracket
- b: FAM II 2.4D Engine oil pan bracket
- c&d: HFV6 3.2L Engine Oil Pan Bracket
- e: Manual transaxle bracket assembly
- f: Automatic transaxle bracket assembly
- g: Transfer case bracket (M/T and A/T)
- h: Gearbox suspension bracket assembly (M/T & A/T)
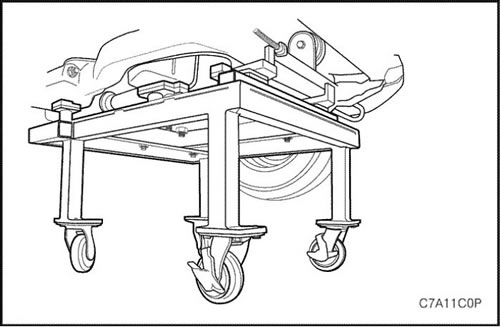
Attention! Lower the vehicle enough to take the load off the engine mount and transaxle assembly, otherwise damage to the suspension and rack/rack bracket failure may occur.
25. Lower the vehicle and place the engine assembly on the EN-48243 engine install/remove rack assembly with the EN-48244 rack bracket to support.
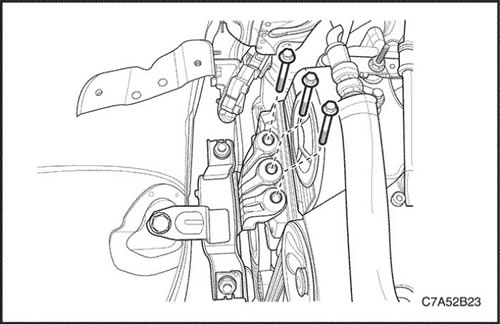
26. Remove the engine mount bolt from the engine mount bracket.
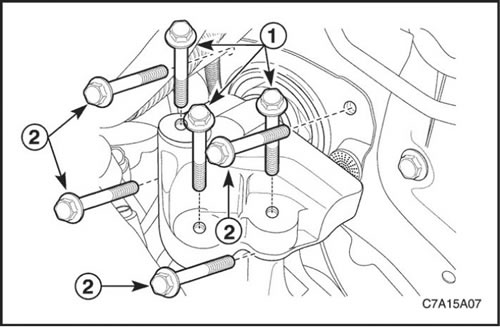
27. Remove the transaxle hanger bolt assembly from the transaxle.
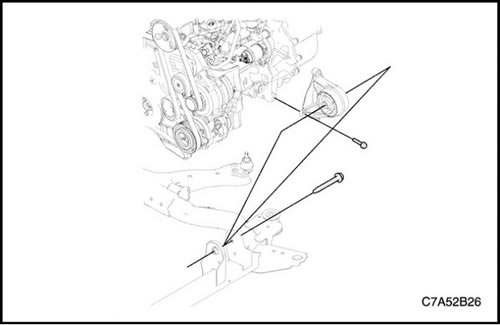
28. Pull up the engine assembly with a lifting device, etc.
29. Remove the front transaxle suspension with final drive assembly.
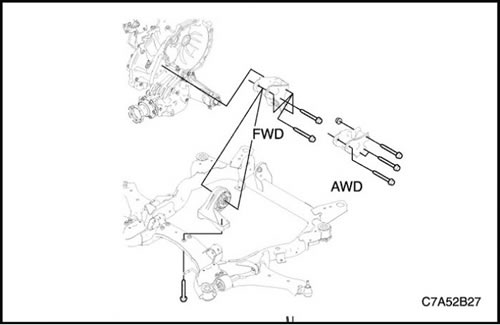
30. Remove the rear suspension of the gearbox with final drive assembly.
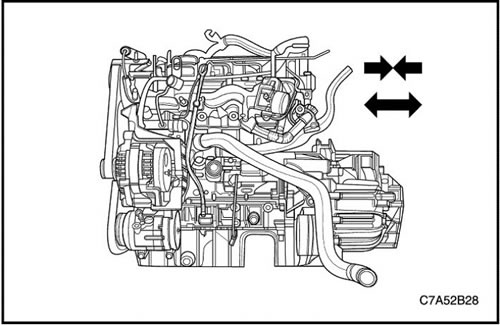
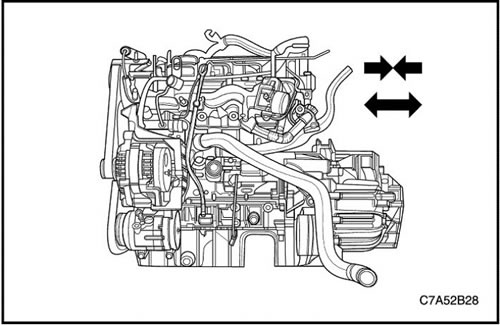
31. Remove the engine and gearbox with final drive assembly.
Installation procedure
1. Install the transaxle assembly to the engine assembly.
Tighten
Tighten the transaxle pinch bolts to 75 Nm (55.3 lb-ft).
Tighten bolts securing oil pan flange to transaxle assembly to 50 Nm (36.9 lb-ft).
2. Install the support on the EN-48243 engine removal/installation rack assembly with the EN-48244 rack bracket, and then assemble the engine and transaxle assembly on the support.
Attention! Verify that all components of the EN-48243 Motor Assembly Removal/Installation Rack are aligned exactly with the EN-48244 Rack Bracket.
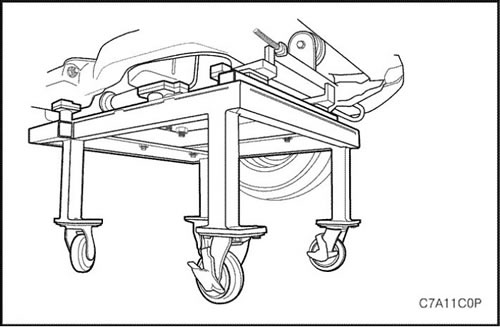
3. Lower the vehicle and place the engine and transaxle assembly connected to the support on the EN-48243 engine install/remove rack assembly with EN-48244 rack bracket in the vehicle.
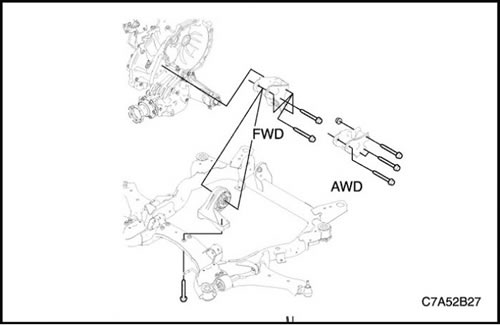
4. Install the transaxle rear suspension with final drive assembly.
Tighten
Tighten the transaxle rear suspension bolt to 90 Nm (66.4 lb-ft).
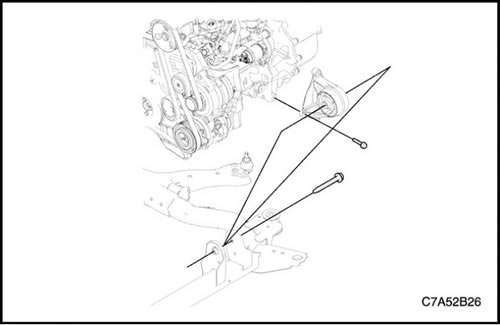
5. Install the front transaxle suspension with final drive assembly.
Tighten
Tighten the transaxle front suspension bolt to 90 Nm (66.4 lb-ft).
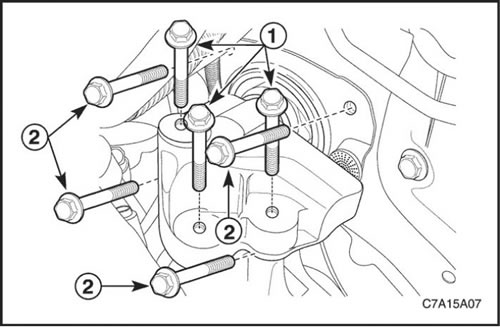
6. Establish a suspension bracket of the check point with the main transfer in gathering.
Tighten
Tighten lock bolts (2) transmission suspension unit with final drive assembly torque 37 Nm (27 lb-ft).
Tighten lock bolts (1) fastening of an arm of a suspension bracket of a transmission with the main transfer in gathering the moment of 50 Nm (37 lb-ft).
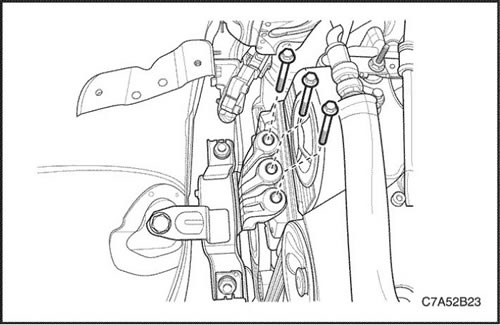
7. Install the engine mount bolt.
Tighten
Tighten the engine mount bracket retaining bolts to 50 Nm (37 lb-ft).
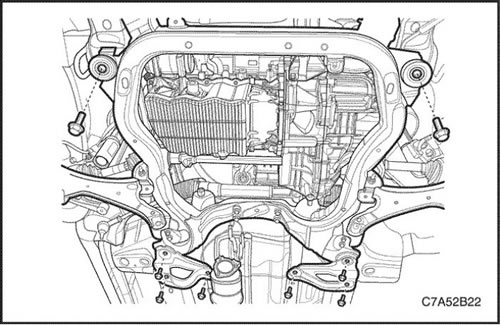
8. Remove the EN-48243 engine removal/installation rack assembly from the vehicle with the EN-48244 rack bracket.
9. Screw the fixing bolts connecting the support to the body. See section 2C, "Front suspension".
Tighten
Tighten the frame mounting bolts to 155 Nm (114,3 lb-ft).
10. Install the support bracket retaining bolts. See section 2C, "Front suspension".
Tighten
Tighten the frame bracket bolts to 50 Nm (36,9 lb-ft).
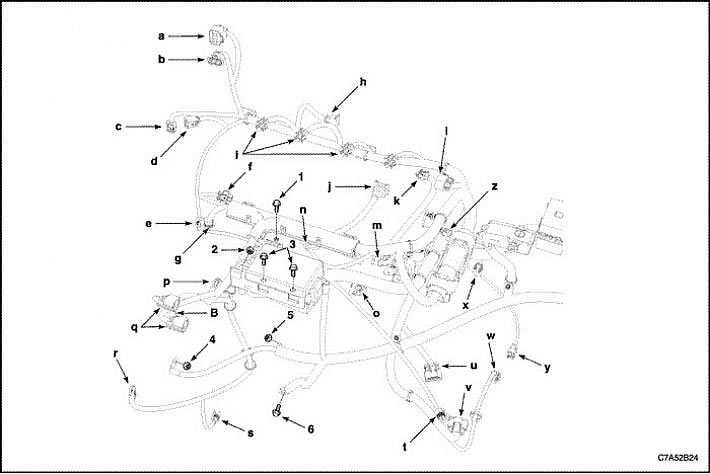
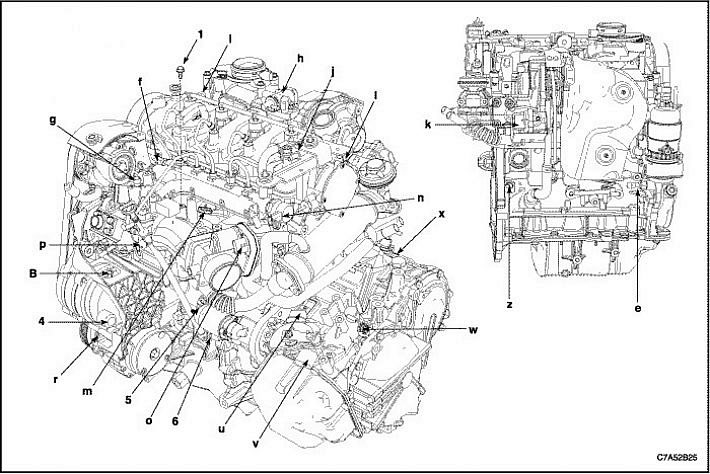
11. Connect engine wiring harness.
- a) Connect the fuel heater connector.
- b) Connect the MAF sensor connector (MAF).
- c) Connect the exhaust gas temperature sensor wire connector.
- d) Connect the diesel particulate filter pressure sensor connector (DPF).
- e) Connect the engine oil pressure sensor connector.
- f) Connect the common rail pressure sensor connector.
- g) Connect the coolant temperature sensor connector.
- h) Connect the EGR vacuum solenoid connector.
- i) Connect the fuel injector connector.
- j) Connect the camshaft position sensor connector (CMP).
- k) Connect the turbocharger drive connector.
- l) Connect the glow plug wire connector.
- m) Connect with boost pressure sensor connector (T-MAP).
- n) Connect the common rail regulator connector.
- o) Connect the ETC housing connector.
- p) Connect the fuel injection pump connector.
- q) Connect the cooling fan connectors.
- r) Connect the A/C compressor connector.
- s) Connect the starter solenoid wire connector.
- t) Connect the A/C pressure sensor connector.
- u) Connect the transaxle range switch connector if it is an automated transaxle transaxle assembly.
- v) Connect the electrical wiring connector of the transaxle assembly if it is an automated transaxle assembly.
- w) Connect the input shaft speed sensor electrical connector if it is an automated transaxle with final drive assembly.
- x) Connect the output shaft speed sensor electrical connector if it is an automated transaxle.
- y) Connect the speed sensor connector if it is a manual transaxle with final drive assembly.
- z) Connect the crankshaft position sensor.
- (B) Connect the generator connector.
- Tighten the engine connector pinch bolt on the intake manifold.
- Tighten the nut of the glow plug module.
- Install the glow plug fuse box bolt.
- Tighten the alternator B+ connector nut.
- Install the starter solenoid connector nut.
- Install the engine ground screw.
Tighten
Tighten the pinch bolt of the engine wiring harness terminal block to 15 Nm (11.1 lb-ft).
Tighten the lock nut of the glow plug module to 14 Nm (10.3 lb-ft).
Tighten the glow plug fuse box bolts to 10 Nm (88.5 lb-in).
Tighten the alternator B+ connector nut to 25 Nm (18.4 lb-ft).
Tighten the nut of the starter solenoid valve connector to 15 Nm (11.1 lb-ft).
Tighten the engine block ground bolt to 25 Nm (18.4 lb-ft).
