Inspection of brake pads and parking brake pads
1. Raise and secure the vehicle.
2. Remove rear wheels. Follow Section 2E, Tires and wheels.
3. Visually inspect brake shoe and parking brake shoe for minimum thickness and wear.
4. Measure the thickness of the pads. See «General specifications» in this section.
5. Brake pads should be changed as a set, on both wheels of the axle.
5. Brake pads should be changed as a set, on both wheels of the axle.
6. Install the rear wheels. Follow Section 2E, Tires and wheels.
7. Lower the car.
Rotor Inspection
Brake discs are built to tight tolerances for thickness, flatness, and runout, but discs develop pitting and grooves during service. Inadmissible deviations in the shape of the brake surfaces of the disc can lead to inefficient braking and pulsation of the pedal when braking. The roughness of the disc surface is also important, since its deviation from the required values \u200b\u200bcan lead to the vehicle pulling to the side during braking and to rapid wear of the linings. If the disc does not meet the specifications, then it must be ground or replaced. Grinding the disc should only be done with precision equipment.
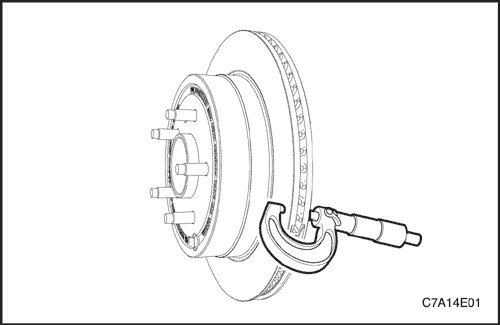
Checking the thickness of the brake disc is carried out by measuring at least four places around the circumference of the disc. All measurements should be taken at the same distance from the edge of the disc. If the obtained disc thickness values differ from each other by more than 1.0 mm (0.04 inch), this may cause the brake pedal to pulsate and/or the front of the vehicle to vibrate when braking. The thickness can be measured with an ordinary micrometer and should not be less than 20 mm (0.79 inch).

Slight scuff marks are allowed on the disc surface, the depth of which does not exceed 0.40 mm (0.016 mm). Seizure depth can be measured with a conventional brake micrometer.
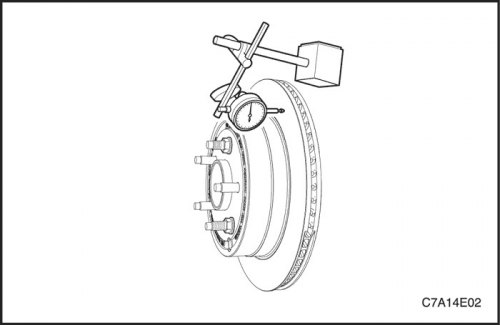
The maximum allowable lateral runout is 0.04mm (0.001 inch). If the lateral runout is greater than specified, check that there is no dirt between the disc and hub, or any nicks or scratches on their mating surfaces. Checking the axial runout of the disk is carried out using a conventional indicator in the following way.
1. Set gear lever to neutral position (NEUTRAL) and raise the car.
2. To keep the wheel balanced, you need to mark the position of the wheel and hub relative to each other. Remove rear wheel.
3. Attach the brake disc to the wheel hub.
4. Install a dial indicator on the caliper.
5. Install the indicator probe at a distance of about 10 mm (0.39 inch) from the outer edge of the disk at a right angle to its surface and with a slight preload. Rotating the dial, observe the indicator readings.
6. After completing the measurements, remove the indicator and wheel nuts.
7. If necessary, grind the disc on precision equipment. After grinding, the runout must be measured again. If the runout after grinding exceeds 0.04 mm (0.001 inch), the brake disc must be replaced.
8. Align the marks that were made before removing the wheel and install the rear wheel.
9. Lower the car.

